
To create a link like THIS is fairly simple. All it requires is a little html knowledge. Or easier yet, a link to a great website: W3Schools!
But basically, all you have to do is copy and paste this into your html:
<a href="http://www.pavelstudios.com/"target="_blank">Visit Pavel Studios!</a>
The code above will end up looking like this: Visit Pavel Studios!
Then make sure to erase and fill in the appropriate info. First is the web address where visitors will be sent when they click the link. the target=blank just means that the new website will open in a new window. And the last part is what your visitors will see and be able to click on.
And for anything that you could possible EVER need to know about html or any type of coding for that matter, just check out this awesome website: W3Schools!
Read More......
Sunday, May 24, 2009
What ever happened to the Bar None candy bar?
Bar None was my favorite candy bar of all time! I'm not sure if it is just the memory of picking them up at 711 every week when I was a kid or if they were really all that great, but I sure would like to have one right about now to find out. But to my dismay Hershey's no longer makes the Bar None.
The Bar None was first came out in 1986 and in my opinion was the best candy bar ever. It had a chocolate wafer in the center with layers of chocolate creme in the middle, topped with crushed peanuts, and covered in milk chocolate. Mmmmm.
Around 1993 Hershey's revamped the candybar into more of a Twix type configuration and it lost popularity soon after and dropped from the store shelves.
All is not lost however, there is an online Petition to resurrect the Bar None. So please, go forth and voice your opinion to Hersheys!
Read More......
Sunday, April 19, 2009
How to replace a fuel injector on a toyota 4 runner
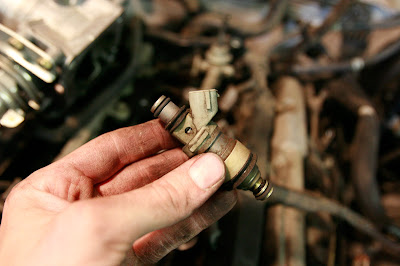
There it is, on most cars the fuel injectors are fairly easy to get to. But on my 1997 Toyota 4 runner, it is buried under half the engine which has to be totally removed just to get near the fuel injector. It looks more complicated than it is though and I'll guide you through the process, including pictures.
A little background info on the symptoms: I first noticed the 4 runner was having a rough idle and thought maybe I got some bad gasoline. After that didn't pan out, I replaced the spark plugs and wires but still no luck. I drove it to Autozone and had them run it on one of those diagnostic machines. The code that came up said there was a misfire in cylinder 2. So I replaced the spark plug once again but no luck. The only other option was a bad coil pack or a bad fuel injector. So I took it to the Toyota dealership to see what they said. I think it cost about $90 for them to tell you what the problem is. Sure enough it came back as a bad fuel injector. And the dealership wanted $450 to replace it!!! I dont think so... So here is how easy it is. It took me about 3 hours total and I'm not even much of a mechanic. The vehicle is a 1997 Toyota 4runner 2wheel drive. The Engine is a 6 Cylinder N 3.4L EFI DOHC, in the engine compartment is says 3400 4 CAM 24. All that said, I'm sure there are many similarities to other Toyota engines as well.
The first thing you will need is some very simple tools:

A screwdriver, pair of pliers and needlenose pliers might help, a 10mm and 17mm wrench, a socket wrench, 10, 12, and 14mm sockets, and an extension bar. Believe it or not, those are the only tools I needed for this whole project.
First you will disconnect the negative battery terminal:

Take off the gas cap to relieve some fuel pressure

I may not know the proper names for all these things so dont make fun. But next you will need to remove the air intake hose. As you are removing things take note how thay are attached. Also, I cant mention every hose and connection, but there are a lot of hoses that will need to be removed to take these parts off. The good thing is that they are pretty easy to figure out where they go later on when putting everything back together. Just make sure to leave on side of a hose connected.

Next we will remove the throttle body:

First disconnect the cables by rotating up and out:

Now undo the bolts on top and bottom with 12mm socket:

now it will slip right off:

Next we will work on removing the top half of the air intake plenum, or this thing:


Make sure to keep all of your bolts on a jar or someplace safe:

Remove the cables and pull them up out of the way:

Take off the hoses:

And pull it straight up and out:

Now put those bolts aside so as not to mix them with the next set of bolts:

Now start removing the bottom section:

Dont forget this little doodad:

These are all the bolts you should have before it will lift off. Be carefull here because there are some hidden bolts on the back and right side that are easy to miss:

You will also need to take off this guy who is hiding:

And this bolt too:

Make sure the hoses are disconnected and lift straight up:

We are getting close. this is your fuel rail and will need to come off next:

Undo the fuel injector clips by squeezing and pulling up:

Use the 17mm wrench to remove the gas line, fuel is going to spill out so be VERY careful:

Undo 2 bolts and then lift the fuel rail Straight up:

Here is that fancy little fuel injector that cost me $200.00, it must be made of hardtoobtainium! I just needed to replace one but THIS IS IMPORTANT... Make sure to replace the o-rings on any fuel injector that you have pulled out. I made the mistake of trying to use the old o-rings and had to do all of this twice!

Put all of the injectors along with new o-rings back onto the fuel rail first. Then, lower the rail into place, DONT tighten the fuel rail down yet:

Make sure you do it in this order. Put this bolt back in place. Remember the washers:

Just snug it up for now:

Not clip the clips back on:

Next, tighten the rail up, then make sure to tighten that other bolt from snug to tight:

Everything else is pretty much just reverse of what we did earlier but here are pics anyway. Connect that little bolt before you put the bottom of the air intake plenum back on:

Now set it down and tighten bolts and put hoses back on:

Now attach the top plenum:

And the throttle body, remember the cables:

Here is what it should look like:

Now attach the air intake:

Put the gas cap back on:

And the battery terminal:

You should now be set to start it up. MAKE SURE to check for leaks before you hit the road!
Read More......
Friday, March 13, 2009
How to See an Augmented Reality
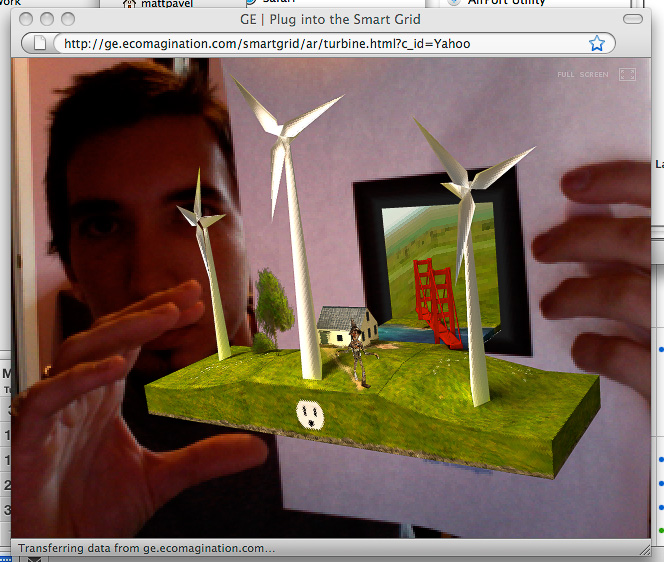
This is really cool! At first you might not know what you are looking at but this is a new technology and GE has put it to use in a silly but very fun little website. The image you see above is a screen capture of my computer screen while on their Augmented Reality Website
If you have a web cam what you are going to do is go to the website and print out this paper
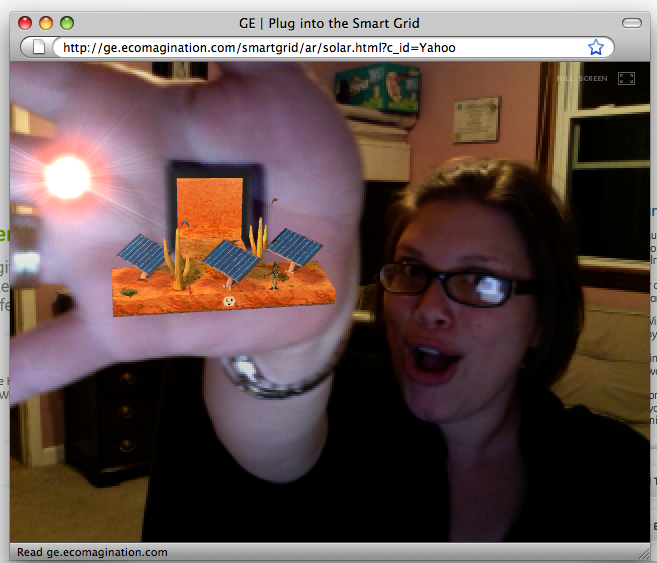
 on any printer. Make sure you are up to date on your Adobe Flash Player , (I needed flashplayer 10). Then click on either the wind turbine or solar energy link, make sure your webcam is active and hold the piece of paper up to the screen. A holographic like animation pops out and not only follows the paper you are holding but also tilts and turns with your movements. The coolest part... If you blow into or near your computers microphone, the turbines get faster and faster!
If you don't have a web cam you can still check out the video on GE's site which shows how it works.
****Update*** I thought this would never work but check it out, I took a pen and drew the symbol on my wifes hand and the key worked just like using the paper...even better:
Way Cool!
Read More......
Thursday, March 12, 2009
Printer Problem? Printer Solution!
Has this ever happened to you? The other day I needed to print something VERY important. I pull it up on my computer, press print, and the print dialogue starts jumping up at me. "Alright, what now" I say. I click on it to investigate further and of course as always... I am out of yellow ink. Well who cares I'm just printing a few words in black only. "I do" says the printer as "I have 6 different color inks and I need all of them to be able to print... AT ALL!"
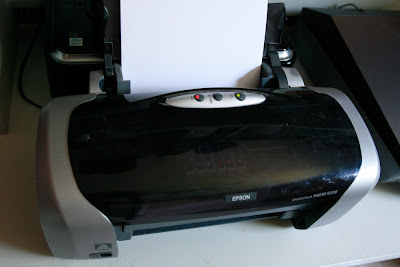
Why does this always happen to me at the most inopportune time? So as I run to the store I start to think. "How much was this printer to begin with??" "$100" you say, "$200"... No, it was FREE after a rebate. Now I ONLY have to pay $13.95 every week when one of the ink cartridges goes out... times six ink cartridges! Thats $83.70 plus tax for a supposedly free printer.
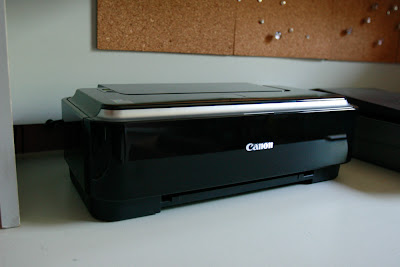
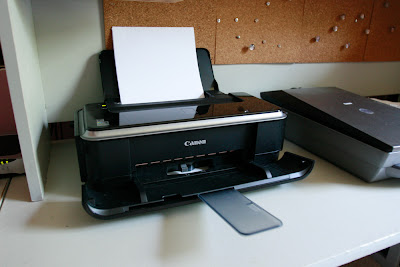
So I get to Wally-World and by now my gears are turning up in my little brain. I go to the electronic section and just for grins I price some of the newer printers. "What's this... $30, $50?? " Ok, I see one I like. A Canon iP2600 for only $29.88, a bargain right? Comes with printer, software, cables, instruction booklet, free photo paper, styrofoam, and a nice sturdy box that could come in handy later, and........... who would have guessed it?? ........INK!
"Wow, that is a bargain" I say to myself! So lets see how much the ink is for this thirty dollar printer. I go over to the ink isle, it is separate from the printers of course. Low and behold "Ink for Canon iP2600". would you like to take a guess??
$35.99
Lets see what this comes with... hmmm only INK. Am I missing something here?
So needless to say, instead of coming home with ink, I ended up with a brand new printer. I see a lot of new printers in my future!
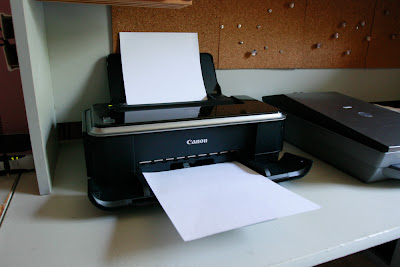
"So what about printing photographs?" you ask. Well I used to do that at home but to tell you the truth, with ink being so pricey it just isn't worth it. There are so many great labs out there that can receive uploaded images over the web and ship them off to you in only a couple of days. Unless you need the print right away, I would suggest finding a lab that you trust. For documents and other junk, I'll use my handy $30 printer until it runs out of ink, then it's time for another!
*** As an addendum to this post: One commenter mentioned that sometimes the new printers come with ink cartridges that are only half or partially full. I guess there might be no way of knowing one way or another but so far I'm still on the same ink cartridges that came with the printer and it is 7 months later. So just keep this in mind before buying.
Read More......

Why does this always happen to me at the most inopportune time? So as I run to the store I start to think. "How much was this printer to begin with??" "$100" you say, "$200"... No, it was FREE after a rebate. Now I ONLY have to pay $13.95 every week when one of the ink cartridges goes out... times six ink cartridges! Thats $83.70 plus tax for a supposedly free printer.
So I get to Wally-World and by now my gears are turning up in my little brain. I go to the electronic section and just for grins I price some of the newer printers. "What's this... $30, $50?? " Ok, I see one I like. A Canon iP2600 for only $29.88, a bargain right? Comes with printer, software, cables, instruction booklet, free photo paper, styrofoam, and a nice sturdy box that could come in handy later, and........... who would have guessed it?? ........INK!
"Wow, that is a bargain" I say to myself! So lets see how much the ink is for this thirty dollar printer. I go over to the ink isle, it is separate from the printers of course. Low and behold "Ink for Canon iP2600". would you like to take a guess??
$35.99
Lets see what this comes with... hmmm only INK. Am I missing something here?
So needless to say, instead of coming home with ink, I ended up with a brand new printer. I see a lot of new printers in my future!


"So what about printing photographs?" you ask. Well I used to do that at home but to tell you the truth, with ink being so pricey it just isn't worth it. There are so many great labs out there that can receive uploaded images over the web and ship them off to you in only a couple of days. Unless you need the print right away, I would suggest finding a lab that you trust. For documents and other junk, I'll use my handy $30 printer until it runs out of ink, then it's time for another!
*** As an addendum to this post: One commenter mentioned that sometimes the new printers come with ink cartridges that are only half or partially full. I guess there might be no way of knowing one way or another but so far I'm still on the same ink cartridges that came with the printer and it is 7 months later. So just keep this in mind before buying.
Read More......
How to Make Photos Larger on Blogger... Step by Step Instructions.
Recently I decided I wanted to have bigger photos on my blogger blog than what it would allow me by default. Up until this point I used the standard blogger upload which looks like this:

But even at the large setting the Images are still too small for my taste.
So there are many ways to accomplish this task but I thought I would share with you the way I found easiest. Feel free to post any comments on how you do it or ideas that would improve upon my method.
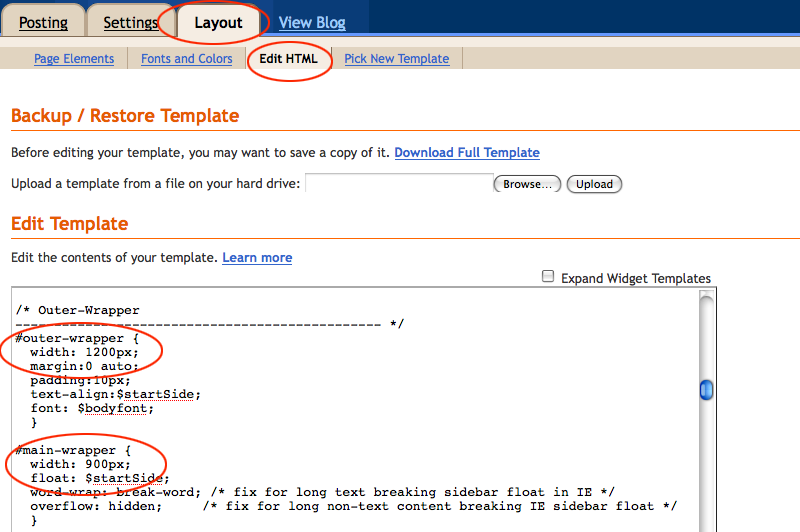
First of all, if you are going to put larger photos in your blog you need to make your blog wider to accommodate. In blogger, go into your "layout" tab and then the "Edit HTML" tab. You will need to change your "outer wrapper" width and "main wrapper" width to 1200px and 900px respectively. See the images for an easier explanation. (You can use different values if you wish, just make sure the outer is largest, and later that your image width is smaller than your main wrapper)
Make sure to hit "save changes" at the bottom of the page. Now the blog is wider and the changes will stay this way so you wont have to mess with the HTML after this.
------------------------------------------------------------
Now for the Images:
From now on instead of uploading your images into blogger, you will be uploading them to a third party instead... don't worry it's easy. In fact, I bet you didn't know it but that's what blogger does anyway! Now there are many sites out there like flickr, photobucket,smugmug,picasaweb, and more. But I am going to recommend picasaweb because that is where your blogger images are already residing:)
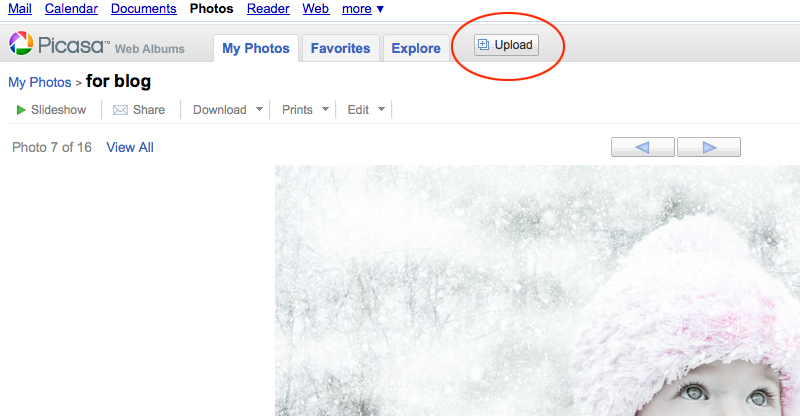
So sign up for one of these sites and upload your images there using a button similar to this:
Once you have a few images uploaded click on an image to make it large. In Picasaweb, you will find something that looks like this on the right side of the web page:
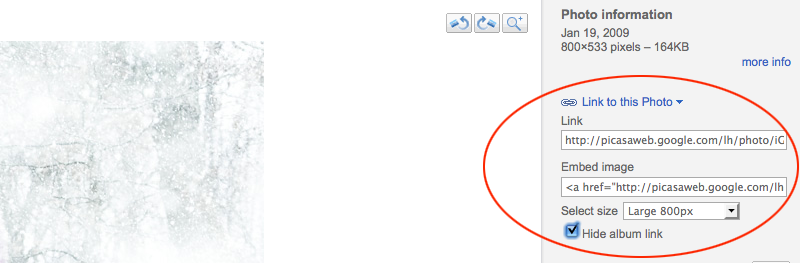
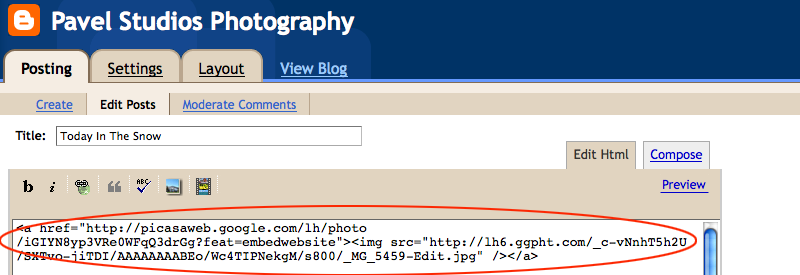
Make the selections I've shown you above and then highlight and copy the "imbed image" code. Then navigate back to Blogger and paste this code into your new post:
Hint: if you are using a site other than Picasaweb you might need to search around for the imbed code but I promise you it's there somewhere.
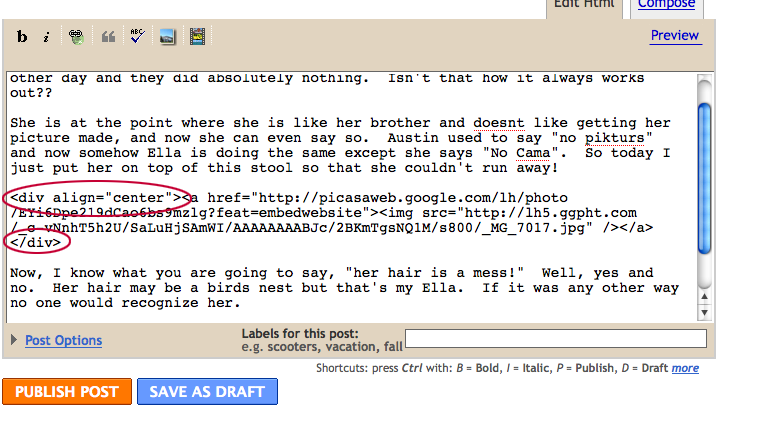
If you want to center the image on the page just add exactly what I have circled here to the front and the end of the code that you just pasted:
Publish the post and what do you know?....Large Photos....Yeah!

-------------------------------------------------------
Now for Professional photographers and more advanced users:
I found this in the picasaweb setting:
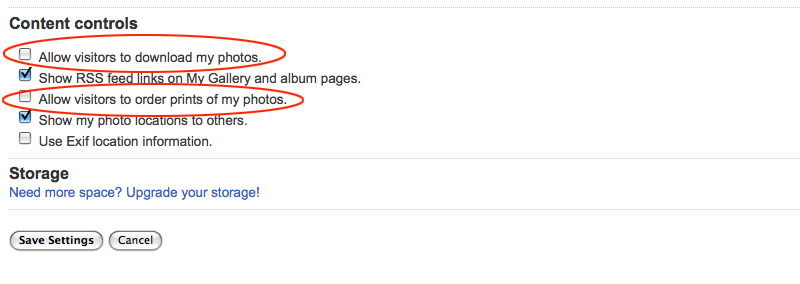
You are going to want to uncheck these boxes I have circled in red or you will be giving away your precious work.
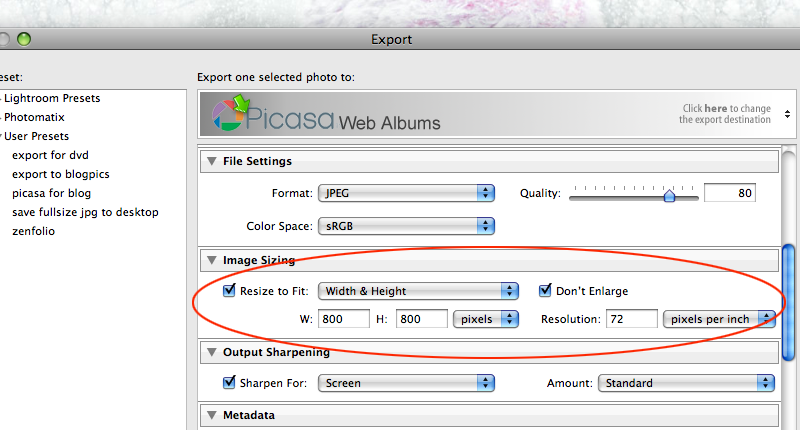
Also, If you use Lightroom, check out Jeffrey Friedl's Blog. He has a plugin that will export from lightroom directly to picasaweb, zenfolio, smugmug, flickr, and facebook! Really cool stuff that saves a LOT of time...Plus it's free!
Read More......
But even at the large setting the Images are still too small for my taste.
So there are many ways to accomplish this task but I thought I would share with you the way I found easiest. Feel free to post any comments on how you do it or ideas that would improve upon my method.
First of all, if you are going to put larger photos in your blog you need to make your blog wider to accommodate. In blogger, go into your "layout" tab and then the "Edit HTML" tab. You will need to change your "outer wrapper" width and "main wrapper" width to 1200px and 900px respectively. See the images for an easier explanation. (You can use different values if you wish, just make sure the outer is largest, and later that your image width is smaller than your main wrapper)
Make sure to hit "save changes" at the bottom of the page. Now the blog is wider and the changes will stay this way so you wont have to mess with the HTML after this.
------------------------------------------------------------
Now for the Images:
From now on instead of uploading your images into blogger, you will be uploading them to a third party instead... don't worry it's easy. In fact, I bet you didn't know it but that's what blogger does anyway! Now there are many sites out there like flickr, photobucket,smugmug,picasaweb, and more. But I am going to recommend picasaweb because that is where your blogger images are already residing:)
So sign up for one of these sites and upload your images there using a button similar to this:
Once you have a few images uploaded click on an image to make it large. In Picasaweb, you will find something that looks like this on the right side of the web page:
Make the selections I've shown you above and then highlight and copy the "imbed image" code. Then navigate back to Blogger and paste this code into your new post:
Hint: if you are using a site other than Picasaweb you might need to search around for the imbed code but I promise you it's there somewhere.
If you want to center the image on the page just add exactly what I have circled here to the front and the end of the code that you just pasted:
Publish the post and what do you know?....Large Photos....Yeah!
-------------------------------------------------------
Now for Professional photographers and more advanced users:
I found this in the picasaweb setting:
You are going to want to uncheck these boxes I have circled in red or you will be giving away your precious work.
Also, If you use Lightroom, check out Jeffrey Friedl's Blog. He has a plugin that will export from lightroom directly to picasaweb, zenfolio, smugmug, flickr, and facebook! Really cool stuff that saves a LOT of time...Plus it's free!
Read More......
Subscribe to:
Posts (Atom)


