
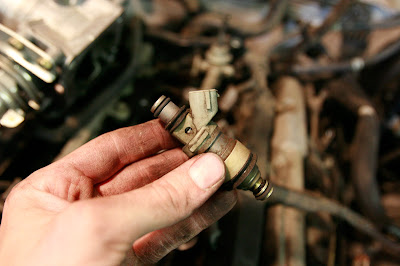
There it is, on most cars the fuel injectors are fairly easy to get to. But on my 1997 Toyota 4 runner, it is buried under half the engine which has to be totally removed just to get near the fuel injector. It looks more complicated than it is though and I'll guide you through the process, including pictures.
A little background info on the symptoms: I first noticed the 4 runner was having a rough idle and thought maybe I got some bad gasoline. After that didn't pan out, I replaced the spark plugs and wires but still no luck. I drove it to Autozone and had them run it on one of those diagnostic machines. The code that came up said there was a misfire in cylinder 2. So I replaced the spark plug once again but no luck. The only other option was a bad coil pack or a bad fuel injector. So I took it to the Toyota dealership to see what they said. I think it cost about $90 for them to tell you what the problem is. Sure enough it came back as a bad fuel injector. And the dealership wanted $450 to replace it!!! I dont think so... So here is how easy it is. It took me about 3 hours total and I'm not even much of a mechanic. The vehicle is a 1997 Toyota 4runner 2wheel drive. The Engine is a 6 Cylinder N 3.4L EFI DOHC, in the engine compartment is says 3400 4 CAM 24. All that said, I'm sure there are many similarities to other Toyota engines as well.
The first thing you will need is some very simple tools:

A screwdriver, pair of pliers and needlenose pliers might help, a 10mm and 17mm wrench, a socket wrench, 10, 12, and 14mm sockets, and an extension bar. Believe it or not, those are the only tools I needed for this whole project.
First you will disconnect the negative battery terminal:

Take off the gas cap to relieve some fuel pressure

I may not know the proper names for all these things so dont make fun. But next you will need to remove the air intake hose. As you are removing things take note how thay are attached. Also, I cant mention every hose and connection, but there are a lot of hoses that will need to be removed to take these parts off. The good thing is that they are pretty easy to figure out where they go later on when putting everything back together. Just make sure to leave on side of a hose connected.

Next we will remove the throttle body:

First disconnect the cables by rotating up and out:

Now undo the bolts on top and bottom with 12mm socket:

now it will slip right off:

Next we will work on removing the top half of the air intake plenum, or this thing:


Make sure to keep all of your bolts on a jar or someplace safe:

Remove the cables and pull them up out of the way:

Take off the hoses:

And pull it straight up and out:

Now put those bolts aside so as not to mix them with the next set of bolts:

Now start removing the bottom section:

Dont forget this little doodad:

These are all the bolts you should have before it will lift off. Be carefull here because there are some hidden bolts on the back and right side that are easy to miss:

You will also need to take off this guy who is hiding:

And this bolt too:

Make sure the hoses are disconnected and lift straight up:

We are getting close. this is your fuel rail and will need to come off next:

Undo the fuel injector clips by squeezing and pulling up:

Use the 17mm wrench to remove the gas line, fuel is going to spill out so be VERY careful:

Undo 2 bolts and then lift the fuel rail Straight up:

Here is that fancy little fuel injector that cost me $200.00, it must be made of hardtoobtainium! I just needed to replace one but THIS IS IMPORTANT... Make sure to replace the o-rings on any fuel injector that you have pulled out. I made the mistake of trying to use the old o-rings and had to do all of this twice!

Put all of the injectors along with new o-rings back onto the fuel rail first. Then, lower the rail into place, DONT tighten the fuel rail down yet:

Make sure you do it in this order. Put this bolt back in place. Remember the washers:

Just snug it up for now:

Not clip the clips back on:

Next, tighten the rail up, then make sure to tighten that other bolt from snug to tight:

Everything else is pretty much just reverse of what we did earlier but here are pics anyway. Connect that little bolt before you put the bottom of the air intake plenum back on:

Now set it down and tighten bolts and put hoses back on:

Now attach the top plenum:

And the throttle body, remember the cables:

Here is what it should look like:

Now attach the air intake:

Put the gas cap back on:

And the battery terminal:

You should now be set to start it up. MAKE SURE to check for leaks before you hit the road!
Read More......


 Posts
Posts

