
There it is, on most cars the fuel injectors are fairly easy to get to. But on my 1997 Toyota 4 runner, it is buried under half the engine which has to be totally removed just to get near the fuel injector. It looks more complicated than it is though and I'll guide you through the process, including pictures.
A little background info on the symptoms: I first noticed the 4 runner was having a rough idle and thought maybe I got some bad gasoline. After that didn't pan out, I replaced the spark plugs and wires but still no luck. I drove it to Autozone and had them run it on one of those diagnostic machines. The code that came up said there was a misfire in cylinder 2. So I replaced the spark plug once again but no luck. The only other option was a bad coil pack or a bad fuel injector. So I took it to the Toyota dealership to see what they said. I think it cost about $90 for them to tell you what the problem is. Sure enough it came back as a bad fuel injector. And the dealership wanted $450 to replace it!!! I dont think so... So here is how easy it is. It took me about 3 hours total and I'm not even much of a mechanic. The vehicle is a 1997 Toyota 4runner 2wheel drive. The Engine is a 6 Cylinder N 3.4L EFI DOHC, in the engine compartment is says 3400 4 CAM 24. All that said, I'm sure there are many similarities to other Toyota engines as well.
The first thing you will need is some very simple tools:
A screwdriver, pair of pliers and needlenose pliers might help, a 10mm and 17mm wrench, a socket wrench, 10, 12, and 14mm sockets, and an extension bar. Believe it or not, those are the only tools I needed for this whole project.
First you will disconnect the negative battery terminal:
Take off the gas cap to relieve some fuel pressure
I may not know the proper names for all these things so dont make fun. But next you will need to remove the air intake hose. As you are removing things take note how thay are attached. Also, I cant mention every hose and connection, but there are a lot of hoses that will need to be removed to take these parts off. The good thing is that they are pretty easy to figure out where they go later on when putting everything back together. Just make sure to leave on side of a hose connected.
Next we will remove the throttle body:
First disconnect the cables by rotating up and out:
Now undo the bolts on top and bottom with 12mm socket:
now it will slip right off:
Next we will work on removing the top half of the air intake plenum, or this thing:
Make sure to keep all of your bolts on a jar or someplace safe:
Remove the cables and pull them up out of the way:
Take off the hoses:
And pull it straight up and out:
Now put those bolts aside so as not to mix them with the next set of bolts:
Now start removing the bottom section:
Dont forget this little doodad:
These are all the bolts you should have before it will lift off. Be carefull here because there are some hidden bolts on the back and right side that are easy to miss:
You will also need to take off this guy who is hiding:
And this bolt too:
Make sure the hoses are disconnected and lift straight up:
We are getting close. this is your fuel rail and will need to come off next:
Undo the fuel injector clips by squeezing and pulling up:
Use the 17mm wrench to remove the gas line, fuel is going to spill out so be VERY careful:
Undo 2 bolts and then lift the fuel rail Straight up:
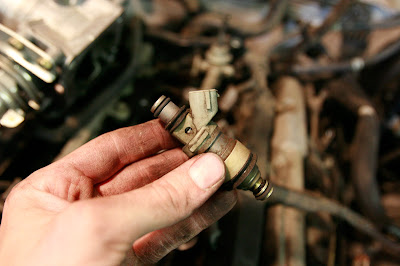
Here is that fancy little fuel injector that cost me $200.00, it must be made of hardtoobtainium! I just needed to replace one but THIS IS IMPORTANT... Make sure to replace the o-rings on any fuel injector that you have pulled out. I made the mistake of trying to use the old o-rings and had to do all of this twice!
Put all of the injectors along with new o-rings back onto the fuel rail first. Then, lower the rail into place, DONT tighten the fuel rail down yet:
Make sure you do it in this order. Put this bolt back in place. Remember the washers:
Just snug it up for now:
Not clip the clips back on:
Next, tighten the rail up, then make sure to tighten that other bolt from snug to tight:
Everything else is pretty much just reverse of what we did earlier but here are pics anyway. Connect that little bolt before you put the bottom of the air intake plenum back on:
Now set it down and tighten bolts and put hoses back on:
Now attach the top plenum:
And the throttle body, remember the cables:
Here is what it should look like:
Now attach the air intake:
Put the gas cap back on:
And the battery terminal:
You should now be set to start it up. MAKE SURE to check for leaks before you hit the road!
Sunday, April 19, 2009
How to replace a fuel injector on a toyota 4 runner


Subscribe to:
Post Comments (Atom)


61 comments:
Awesome write up! I was having a cylinder misfire on my 99 4runner. Changed the plugs and wires and finally discovered it was a bad injector. Thankfully mine was on cylinder 3 (in the middle on the passenger side) and relatively easy to get to. Even though mine was on the other side, your write up was *very* helpful. One tip I found is that to get as much fuel as possible out of the rail before you take it off, first disconnect the fuel pump connector (accessible via access panel under rear driver's side seat and then run engine until it dies. Also, the "washers" on the fuel rail bolt are actually gaskets and theoretically non re-usable according to the service manual. I replaced mine just to be safe.
Thanks again!
We did the same job on the same vehicle this week but the engine is not starting up now but everything is connected right we cant find the problem any ideas?
Thanks for the great write up. My bad injector was on the other side (cylinder #5) also but this was still very helpful. When I pulled up on the fuel rail it disconnected from all 3 injectors rather than pulling the injectors out of the engine block. Just wound up replacing the o-rings on the top of the injectors instead of at the bottom.
You are my HERO!!! Shops wanted $500 to do this job and I cant afford that right now. A million thanks!
just replced mine on cyl 3, piece of cake. You dont have to disconnect any fuel lines or take the throttle body off. Just disconnect all the hoses and connectors and the manifold will come off with the TB. Remember to inspect your valve cover gaskets while you have everything taken apart.
Do i need to replace my intake manifold gaskets when i do this or can i use the old ones
might as well replace them while you are in there, they should be fairly cheap
get web page....everything works, but I have a bad fuel smell and i dont seem to find anything leaking! whats up with that?
sorry, I meant great webpage
I also have abad fuel smell, I am doing this and replacing all the orings on the fuel injectors, hopefully that helps. To the previous poster, did you ever find out what was wrong with yours?
Dude...first time I've seen this site and I'm amazed at your pics and simplicity of the fuel injector replacement process! My 96 4runner just started misfiring on my #3. I've been worried about attempting the process but with these pics and instructions...wow! Can't get much simpler than this. THANKS!!
Your write up gave me the confidence to do this job myself and it worked beautifully, thanks!!
Since it was the #6 injector the plenum needing pulling but after 3 hours this 2000 4runner, 300K miles runs like a puppy!
this is great.thanks so much
My 2000 4Runner (127k miles) was running rough and had abnormal engine block vibrations, but only after a warm start...it never occurred after a cold start. I took it to my local Toyota dealership and they diagnosed it as a bad #6 injector. They quoted me $850 to replace this one injector, and then recommend I replace all six at a whopping $1500. I think I'll use your guide here and see if I do it myself. Any thoughts about replacing more than just the one bad injector now? Thanks
ya, my philosophy is don't fix it unless it's broke!
Great pictures and description of each step. I just had my laptop open to this page and did all the steps just as you outlined them.
thank you soooo much! Had trouble with restarting my 96 toyota 4Runner SR5 esp when hot. Got all my injectors flow tested and cleaned, but not much found wrong, about 5-6% injector improvement. Initial starting now more of an issue vs restarting it hot. Now looking at fuel pump. Got any pictures of that ;)
Thanks so much........I've never worked on my 4runner other than general upkeep......these instructions wre fantastic. Just as i suspected I had a bad injector on cylinder #2 so I just replaced all three (2,4,6) and she is running fantastic.
Thanks again !
Used your blog to replace my number 6 on my 99, subtle differences but you step by step was way better than a manual. Thanx!
Does anyone else think it's weird how many of these people are having the #3 injector fail? Mine has failed now for the second time in 4 years. Wonder what's up with that?
This saved my day as well. Bad injector as well and was looking at spending a ton. Used this to pull it apart and pulled all six injectors in about 3 hrs. Waiting for the injectors to come back from Witchhunter Performance now and hope this solves the problem. Hoping this stays up at least until I get mine back together, not sure I'll remember how to put it all back together otherwise!
I had the same problem. Thanks to your instructions, I was able to replace fuel injector #3. Glad it was not on the even numbered cylinders. Yota runs nice again.
Thank you so much while I am waiting for Toyota dealer to call me back on checking the fuel leaking after being charged $550 for replacing the injector #2 yesterday. Lucky enough the runner has not being burned down with the fuel leaking down. I might do this by myself following your instruction next time.
Thank you for sharing, it was very helpful . I helped me to be able to replace the Ignition Coil also.
Thanks! I've been getting a P0305 misfire code (cylinder #5). After ruling out plugs, wires, and ignition coils I replaced the fuel injector. Your write-up and pictures were very helpful.
my 99 4Runner has a misfiring cyclinder #1 (not when cold, not when hot, only for ~20 mins when i turn it off for 30-6mins somewhere...it runs rough for 30 mins and then smooths out. Took it to dealer. he got it to run rough, and found that #1 had ohm reading of 43. Question: could this be simply that i need to have dealer "clean" the fuel injectors? sure hate to pay $200 for the injector and either follow these directions (which are amazing!) or have dealer $200 labor. then...once all this stuff is off....do you replace all 6 while you're at it? $1200 seems crazy for new fuel injectors. any advice?
I've got #4 cyl. showing this code. I have the new injector & upper O-Rings for #2 & 6. I am attempting this tomorrow feeling more confident, along with your instructions. Thank you for posting this! I will follow up on results. Wish me luck!
Nice info....thx! For anyone else attempting this, you might want to take extra precaution and put a clean rag over your intake inlets to keep out dirt, leaves and any other harmful debris that could fall in. Just an extra precautionary step. I truly believe the old adage, "an ounce of prevention is worth a pound of cure".
Thanks for your time and effort with this tutorial. I too had a misfire code, P0306, so I knew it was #6 cylinder. Thought I had it figured out when I tested the plug wires and #6 showed bad. Replaced wires and still had the miss....go figure. Swapped coil packs and plugs, still no help. That narrowed it down to the injector. The odd thing with mine was that some times it would run fine and the next minute it would miss. Also the CEL would flash sometimes while driving under a load. Anyway, with the help of your tutorial it was a piece of cake to replace the injector. Not a hard job by any means. Just set aside a few hours and take you time. 4Runner runs like a Swiss watch now.. Thanks Again. BTW...I have the same year as yours with 130k on the clock.
Hey, thanks very much for the instruction on doing this! I looked at your site, gathered my tools and 45 minutes later the car was running like brand new! I thought it was originally the spark plugs causing the issue and although they were fouled out pretty bad, changing them did not solve the issue. I dreaded having to change out the fuel injector simply because it looked like a pain. However, after memorizing your instructions, I just went out and did it and I have my 4runner back! Thanks again.
Scott
Good instructions. Notes: 1) do cover the intakes when the manifold is off. One of the injector plenum washers popped off the end and nearly went down! 2) There are two washers on the end of the plenum, one of each side of the fuel line commotion. Be sure to find both. They may stick to adjoining brass pieces. 3) you'll get two medicine capfuls of fuel...place a small cloth below to catch. 4) There is a small vacuum line that runs across the lower half of the intake manifold you'll need to disconnect. Be sure to reconnect before putting top half back on. 5) About 2 hours to accomplish with parts in hand.
This is a great write up, thanks a lot!
I Just replaced my injectors -- all six of them -- on my 99 4runner, 3.4. After that I took it for a test ride. The idle is rough, got some nasty smoke from under the hood. The scanned code is P0172. What went wrong? Please help. Thank you!
What a great job you did in writing up this step by step instructions on how to replace an injector on your 96 4runner.
Cheer,
Very good blog thanks for sharing. Please visit http://goo.gl/l0accw
Thanks for the write-up! I put this to use last night. My 4runner (1997 Limited, 165k miles) was throwing a P0304 code and I changed out all 6 fuel injectors. I bought the injectors off of Ebay for $60. So far everything is running smoothly. Fingers crossed! Thanks again! I really appreciate it!
Excellent post man'' thanks a million'' ;)
Has anyone tried using those Chinese injectors?? They are like $15. each and free shipping.
Thanks for this great write up! Two things I had difficulty with: 1: The banjo bolt "crush" washers that attach to the end of the fuel rail have failed on me. Got them on order with Toyota for 1.50 and that should fix the leaking fuel. 2: the new o rings on the injectors made it really hard to push back into the injector holes, I've since read that lubing the o rings might make that process easier. I had to lightly hammer on the fuel rail to get it back down (terrifying).
Thanks for this great walk through! I replaced the o-rings on my injectors and crush washers on the fuel rails to try and stop a worsening fuel leak, I sailed through every step wonderfully, then just after I bolted the throttle body back on, I looked down and found one of the rubber sleeves had fallen off "one" of the injectors. (Are you kidding me!?!) So I disassembled everything again, found the culprit, then put it all back together again. Needless to say I feel like an expert on this procedure. Fuel leak is fixed!
This write-up was posted April 2009, 7 years later (April 2016)... It's still proving to be of great guidance and help. Thanks a million OP, I saved a good wad of cash thanks to your efforts and experience you shared regarding this task. Kudos!
Shop from the world's largest selection and best deals for Car and Truck Fuel Injectors. Going Here
I really like the post in your blog. . it really interest me to read. . thanks. .
Fuel Injection Tubes
Great write up. Thanks! Be tackling this this weekend.
Thank you for the pics & reference. VERY Helpful. Just one thing....When screwing back in the Fuel Rail Bolt, the washer goes in between the Rail Cross Member & the rail itself.
This all took me about 4 hrs. which included cleaning out the Throttle Body and the Upper Plenum. I had # 5 fault on a diagnostic tester but seeing I had 220k miles on my 97 4Runner I replaced them all. I purchased A refurbished set on ebay for $60.00 & wow what a difference in throttle response & no more rough starts and surging. Also if your fuel filter has not been replaced in awhile, spend the $20 and replace it too.
Thanks for the great write-up! The only thing I would add is the same as what another commentor said is to lube The o rings with a tad of grease to help them slide into the fuel rail
Hello guys, maybe you know how to put out the Toyota 4Runner errors? (Chek eror)
1990 yar 3.0
Thanks for information, I ended up replacing injectors for cylinders 1 & 2. Every thing is running great now!
Nice blog on how to replace fuel injector in Toyota.
fuel injector repair service San Antonio
foreign auto repair in San Antonio
A great range of products, fuel injectors
Just helped my son do an injector install in his Jeep. It's amazing how different cars can be so similar in terms of the procedure required. Thanks for the great post!
Thanks Man! dove in and had it done in less than two hours.
Much appriciated!
Just wanted to thank you SO MUCH for this write up. It was my first foray into truck repair, and this post was a lifesaver!!!
A very nice guide! Big props for tackling the issue with your Toyota yourself and explaining the process thoroughly.
It definitely isn't easy to change injectors by yourself, even if you are a fairly hands on person. At the same time, having injectors changed by a professional at a repair shop can run a pretty hefty bill. Depending on the care and injectors used, it could cost well over $1000 dollars: http://www.fuelinjectorcleanerhq.com/fuel-injector-replacement-cost/
So with that in mind, it can definitely be worth it to try to change them yourself. Hope a lot people got help from this post!
Good blog along with the excellent quality stuff.
Car Air Filter Replacement in San Antonio
car air cleaner service San Antonio
Thank you for this guide. I have used it successfully on 2 separate ocassions. Its quicker the 2nd time around :) That's $$ in my pocket!
Excellent write up im doing this tommorow its my easter present too me .i found rebuilt injectors here in Washington state at Dr. Injecor for 211 for a set of six i asked him about the ones on ebay and he told me they bought some and checked them the flow was diffrent on everyone and the ohms also there made in hong kong most of them . he supplied me with silcone to put on the injectors and some knowledge . it looks pretty straight forward and your right up should help thanks .
Hi There,
Thank you for sharing knowledgeable blog with us i hope that you will post many more blog with us :)
We can buy best automated Diesel Fuel Injector Pump, System Repair,Fuel Injection,
Click here for more information:- http://www.tomdiesel.co.zw/
Many Autos is private limited company manufacturing Autos sapre parts in reading.Many Autos best spare abs sensor, abs pump,abs ring,ABS Hydraulic Units etc. Many autos also proving door to door repairing services.
Hi There,
Thank you for sharing knowledgeable blog with us i hope that you will post many more blog with us :)
We provides best services online As Like Diesel Fuel Injector Pump System Repair,Fuel Injection Tester,
Contact Us:-
Tell: +1(209) 509-4978
Email: sales@MMjsupermarket.org
READ MORE....
Most of the time u have to turn the ignition off an on 2 or 3 time repress the fuel line's
Respect and that i have a tremendous proposal: House Renovation What Order best renovations to increase home value
Post a Comment